A useful shell prompt
I use my shell a lot and have a pretty good prompt which I have built up over the years. It has got to a point where I think I have a pretty good setup and don't find the need to tweak things a lot and so I thought I would blog about it.
For the uninitiated, a shell prompt is the thing that to see to the left(and right in some cases) of place where you type in your commands in the terminal. It will be usually something like project/path $.
You can find the complete code for my prompt at meain/dotfiles
So yeah, just to begin with here is how my shell prompt looks like when you open a new terminal.
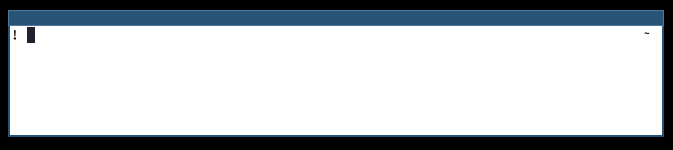
Pretty simple, right? I use zsh and so I can put stuff on both sides. On the left you have a ! mark and on the right you have ~. The one on the right, as you might have guessed is showing which directory I am in, in this case ~ or my $HOME directory. The one of the left, does not mean much as of now, just a marker to tell me where the shell input starts.
Let's make it one level deeper. I am someone who likes to use tmux a lot. I only used to use terminals with tmux until I switched to using Emacs instead of Vim.
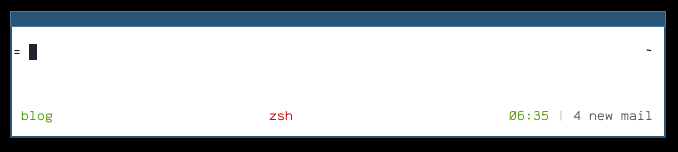
If I get into a tmux session, the prompt changes from ! to =. Just a subtle hint that I am now in a tmux session. On a similar note if I am inside a nix shell, it will switch to using # instead. You can find this piece here.
This char also get a red color if previous command fails. I use Vim mode in the shell and so it changes to blue if we are in normal mode. You can find the code here.
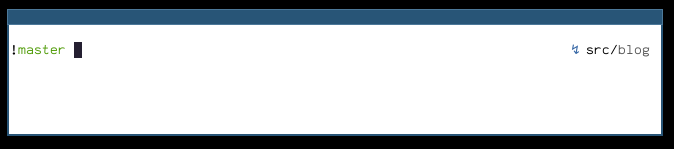
OK, now let's go into a project. Let me navigate to my blog project.
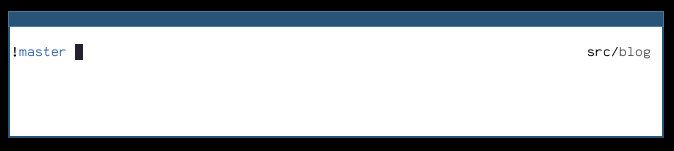
A few things change here. New on the left, along with !, you also have the branch name, in this case master. If you notice, the color of master is blue. This is because I have untracked file. If I add these files to the staging area, then it will turn yellow and once I commit them, it will change to green. I prefer to use colors instead of extra icons to display data if it is possible.
On the right, you will see that we have updated the path. This is always limited to a max of 2 folders. If you look closely, the blog part is in a separate color. This is because blog is the name of the repo on Github.
The Github repo is shown in the path if that string is available there, if it is not available there, then we actually separate it out and show it on the left as a separate block. I did this as in most cases I will be in the root directory and the repo name will be same as the path and didn't want it to take up extra space. You can find the directory/repo display code here.
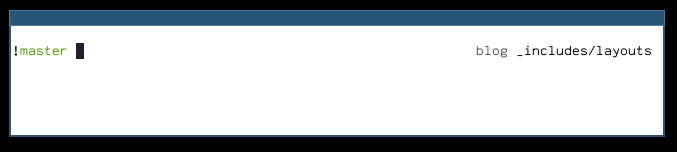
In the above screenshot, since we are inside a nested path which does not contain the repo name, we have separated it out.
Let's look into post commit setup.
If you notice, we now have a lightning on the right. That is to indicate that we have unpushed commits. You can find that module here.
Now to some extra stuff that the prompt does.
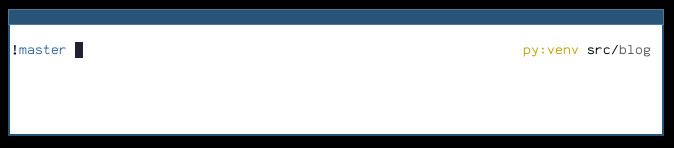
I used to work a lot with python and so a lot of virtualenv switching. Usually if you were to just enable a virtualenv, it just prepends your prompt with (venv-name). It was really sucky and so I disabled that and instead, my prompt now show me py:venv-name on the right if I am in a python virtualenv. This is found here.
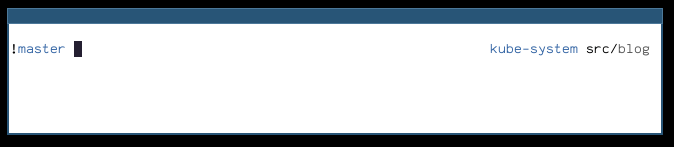
Also, I work with Kubernetes a lot and one info that I would like to have easy access to is the kubernetes namespace that I am currently in. So, if my shell is a directory with any of the kube files or directories like charts, helm or deployemnt.yaml it will add the info about the namespace in blue on the right. You can find the code here.
I have set the prompt to not show me the hostname by default if it is on a local machine, but if not it will show me the hostname as well in the right. Code available here.
There are a few modules in there which I don't actively use as of now, but you might find them useful. You can use this to display the time since last commit. It might give you an idea if something was recently pulled or not. I used to use this to show the commits that I have not yet pushed along with the lighting thing, but decided that was unnecessary information.
I have also added in something to the precmd hook which will let me notify if the previous command took quite some time. You can find the code here. The idea here is that if a command is gonna really take a long time to run, I might not be on that terminal when it completes, but I would like to know that it was completed. I could maybe add a voice message or send a IM as well and that way I can even walk away from my laptop and still know that the command completed execution along with the exact command that completed.
Just missed one more tiny hack. I add a special kind of whitespace character to the left prompt here. This is combined with a tmux keybinding to search just the prompt and navigate between commands easily instead of aimlessly scrolling and looking for the previous one.
With all of this crap being computed every time a new prompt has to be displayed, you might think that it would be slow. And you are partially correct. What I do is I will display the bare minimum when I create a new prompt, compute these in separate threads in the background and then once we have it, update the prompts. This seems to work really well for me. If you see, I don't directly assign the PS1 and RPS1 directly with the full blown stuff, but instead have the very basic. I have two function generate_rprompt and generate_lprompt both of which run separately in the background computing the right and left prompt respectively. Now when the generate_lprompt finishes computation, the result is written to a temp file and sends a USR1 signal which we pick up in the parent process and update the actual left prompt from the temp file. Similar thing is done for the right prompt as well. This way, we don't really block the user from being able to type while we compute stuff.
And there you go. That is most of the stuff in my prompt. It is kinda a lot of random information dumped here, but hopefully this shows you the kind of stuff that you can do in your shell.
For those who don't wanna spend so much time customizing stuff, you can use something prebuilt. You might not be able to get exactly what you want, but most of them are pretty powerful. Let me list down a few ones that might be good:
- Powerlevel10k Successor of the classic Powerlevel9k
- oh-my-zsh themes I have used some of them to see how they implement things
- starship I hear this is very popular
- geometry Looks nice